
We are basing our new homemade sauerkraut how to on Leda Meredith's new book, Preserving Everything, which shows how one can make sauerkraut in a mason jar. We talked with Leda recently on GF Radio: listen here. Links to buy book at end of post ↓
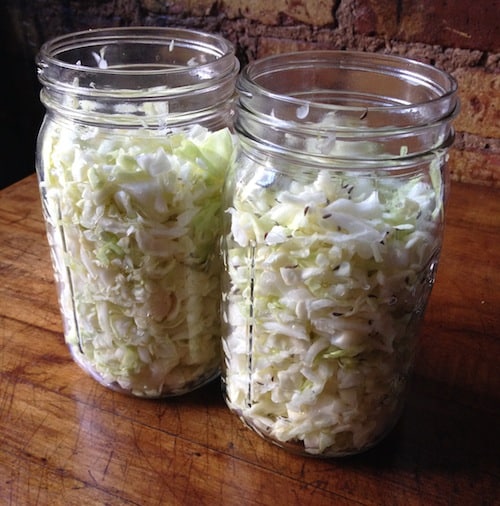
I like this mason jar sauerkraut method, it makes it less daunting than having to go find or buy a big glass jar or crock. Most of us already have a couple of mason jars somewhere. I might have too many jars, according to some family members...
But this is pretty simple, chop up cabbage, add salt, put in jar, wait.
 I couldn't find the shredding blade for my food processor - not surprising - so I cut up the cabbage by hand. Its my experience that shredding with a food processor will yield a much more shredded cabbage, and that will start fermenting much faster than cabbage cut up with a knife.
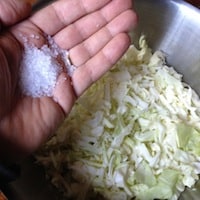
The reason for this is that with a food processor, the cabbage is cut finer, exposing more leaf surface area to the salt. The salt draws some moisture out of the cabbage, and the brine starts to form. With the knife sliced cabbage, this process is much slower. Its also important to basically massage or kinda crinkle the cabbage to break down some cell walls and allow the salt to do its work.
After your cabbage in a jar has let out enough water to create a brine that covers all the fermenting kraut, we will let it sit in a dark place for a few days. We'll be looking for bubbles, a sign that the lacto fermentation has kicked in.
In our case, because of the knife cut leaves, I had to add salt brine to the jar. I set out a pint of water overnight - because our water is chlorinated - and then added a teaspoon of kosher salt to it, and topped off the kraut so that all the leaves were covered in liquid.
You can get Leda's Preserving Everything book here:
Cheri H.
I look forward to updates on this project! I made lacto-fermented jalapenos for the first time this summer and my boys are gobbling them up. 🙂
Sherre
did you cover the jars or put a lid on them?
Eric Gunnar Rochow
yes, after the photo shoot, i put the lids on, but i left the lid loose, i did not screw down the band, you want the lid loose. thx!
Eric Gunnar Rochow
I can't eat hot peppers, but good for you! thx, eric.
Julia
It just gets better! Try fermenting red cabbage with some grated fresh ginger along with the salt. You can tell when it's nicely tart by the color - it will go from purple to bright pink. (red cabbage juice is a pH indicator) The ginger taste stays really fresh with this preparation.
Ted Miller
Homemade sauerkraut is the best! I make it by slicing the cabbage as thin as I can with a 10" chef's knife, adding a tablespoon and a half of natural sea salt to the cabbage in a big bowl, and kneading it for ten minutes. That gives plenty of salt brine so I don't have to add any.
We buy our honey locally in gallon size glass jars so I put the cabbage & brine in those, or in quart size mason jars. Covered with cheesecloth for ten days and it comes out yummy and so good for you!
I check the jars every couple of days and if the kraut gets the yucky foam on the top while fermenting I just skim it off and put the cheesecloth back on.
Love your labs - We have two yellow labs ourselves and they pretty much run the house. Our saying is that "It is a doggy doggy world!"
Ted Miller