
I've been making the No Knead Bread, invented by Jim Lahey and made famous by Mark Bittman, and this time I used 1 cup of all purpose flour, 1 cup whole wheat flour, 1 cup bread flour. All King Arthur brand flours. Worked well. Not a lot of rise, but it was cold in the house this weekend.
Sullivan Bakery Bread, The No Knead Bread Recipe, the Gardenfork version
I've made this bread about 20 times now, and it comes out great every time. I've learned a few things doing this. It really helps that the dough be in a warm place during the long rise time. I let it sit overnight, so I bring it up to the bedroom, as the rest of the house cools down at night ( thanks to our programmed thermostats ).
A viewer emailed me to say that you can also put the dough in the oven and leave the oven light bulb turned on, this will keep it warm enough as well. You don't have to turn on the oven itself, just the oven light.
3 cups all purpose flour. I use King Arthur brand flour.
¼ teaspoon instant yeast
1 tablespoon salt
Cornmeal, preferably coarse ground.
Mix together flour, yeast, and salt in a large bowl. Add 1 ½ cups of warm water ( about 100 degrees ).
Mix with a spatula. The dough will look like it needs more water. It doesn't. Mark Bittman has the best word to describe it, the dough will look "shaggy"
Cover the bowl with plastic wrap and place in a warm spot for about 12 hours. You can let it rise longer if you want. The dough will have a good amount of bubbles in it.
Get out two large cutting boards.
Flour a large cutting board and turn the dough out onto the board with the spatula.
Put a clean towel on the other board and dust the towel with cornmeal.
Take the dough, dust it with a bit of flour and fold it over on itself front to back and side to side.
Then turn the ball of dough so the folds are on the bottom and place in the center of the towel dusted with cornmeal.
Fold the towel ends over the dough and let rise for about 2 hours. The dough should roughly double in size. The dough will not rise up a lot, but will grow outward on the board.
30 minutes before its time to bake the bread, put your dutch oven in the oven with the cover on, preheat the oven to 450 F.
When the dough has risen and the oven is preheated, remove the dutch oven, put it on a wire rack next to the dough on the towel which is on the cutting board.
Slide your hand under the towel and dough, lift up the dough and flip it over into the dutch oven. What you want is the folds of the dough, -what was on the bottom of the dough during the rise - to be on top when it sits in the dutch oven.
Be careful doing this as the dutch oven is very hot.
The dough never lands perfectly in the middle of the dutch oven. I use a wooden spatula to gently nudge it toward the center, pushing down any part of the dough that may be sticking to the side of the dutch oven.
Cover the dutch oven and place in oven for 30 minutes.
After 30 minutes, remove cover, the dough should look like bread and be starting to brown. Remove the cover and bake for another 15 minutes.
The bread should now look like great bread. The crust should be golden brown. You can bake it longer if need be.
When done, remove bread from dutch oven and cool on a wire rack.
You can double this recipe, but be careful with the water, add not quite twice the amount of water, you can always add more.
NEW INFO
my house is quite cool in the winter, and i remember someone suggesting putting the dough in the oven with the oven turned off, but the oven light turned on. so first I had to finally fix the oven light in our 50's era propane stove salvaged from a Vagabond camper trailer. I fixed the light, and left the dough in the oven overnight with the light on.
Being the gadget geek, I put in my temperature probe to see at what temperature the dough would maintain. It stays at about 78 F. Great.
Amy
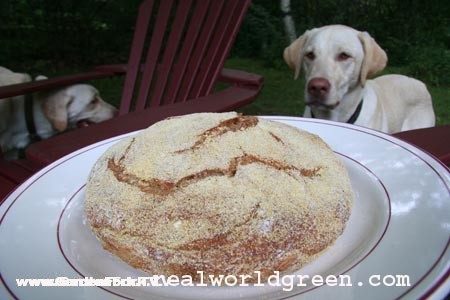
I think Henry wants some of that bread!
mary
your bread looks crustily awesome! gonna make or bring some when you go to the Silo Cooking School? yum!
gingergargoyle
Hi Eric- if you warm the bowl up under hot water and let it set a while then dry it out good, put the dough (covered of course) in the bowl and the bowl in the oven with the heat turned off/light turned on (if you have that option), it won't matter how cold your kitchen gets.
The oven is made to retain heat and the warm bowl will give your dough enough to "pimp out" your yeast...if you can leave the light on in the oven with the door shut, it will maintain around 70-75degrees F which is the perfect temp for rising dough.
Good luck with the dough.
greg the makeup guy
So where's the promised episode of the county fair, blue ribbon roosters and monster pumpkins and such?
Sonya Ihimaera-Hertig
Hi Eric!
My husband and I are currently living in Trinidad & Tobago but about to shift back home to New Zealand and live on our 52 acre property. We have consumed your podcasts like starving people looking forward to our own homemade feasts. Thanks so much for you and your wife's work at making all this good stuff available. I've been making potato bread for a long while now and I was thrilled to successfully make your great no-knead bread. I appreciated seeing it done. The visual helps soo much.
Cheers,
Sonya
Monique Leonard
Hi Eric!
Thanks so much for your podcast. I've been watching for about 6 months and have nearly caught up. And especially thanks for this bread recipe. My circle of friends have monthly pot-lucks where we get the whole gang together - good food, good friends, that sort of thing. I made this bread 4 months ago when dinner was at our house and it was such a hit that ever since the host asks me to bring the bread! They love it. Thanks so much, and keep up the great work with the show.
Jim
Just made this - had been waiting until I could find a dutch oven for cheap. AMAZING! I was so impressed. Thanks for all the helpful tips, Eric!
Tim Lewallen
I made this today in an earthen chicken roaster as I don't have a Dutch oven. It turned out great but had a bit more crust than I like. The crumb was amazing! I'm giving it another shot now with some semolina flour.
harmon mccraw
So far, after a 14 hour rise, the dough looks perfect. I plan to use a Le Creuset 71/2 qt. casserole, which may be too big. I have a Bourgeat copper casserole which is probably 5 qt. I was wondering if you've ever used anything besides iron.
Eric Gunnar Rochow
hi harmon,
i'd stick with cast iron, or a casserole that is ceramic around cast iron, like the Le Creuset. thanks for watching, eric.
Douglas
Hi Eric,
I followed the recipe exactly but when it came time to turn out the dough and fold it after 18 hours, it was much too wet to be formed or folded into anything.
Any idea about what I did wrong and can do to fix it?
Thanks.
erinn conn
Can we bake this bread without the use of a dutch oven? I want to make this tomorrow, and I don't have one. Can I just place it on a pan in the oven?
Kelly Riedel
My daughter and I have made this bread several times now, and have moved to baking in a covered Pyrex casserole - the dutch oven is so heavy. We have also been adding 1/2 cup of asiago cheese in the morning (to dough left out to rise overnight), tumbling the dough to mix in the cheese with a rubber spatula, then rising on parchment paper in a similar size/shaped container as the casserole. We find 440 degrees, 30 minutes covered, 5 to 10 uncovered, bakes the bread to perfection in our oven. We love this recipe, thanks for sharing!
Marie Pettis
Eric - Made your bread today. It smells fabulous in our home! The bread turned out perfect . I divided the dough in half and baked it in a six quart Lodge enamel dutch oven. It made a nice size loaf. Baked it as specified in recipe, even checked internal temp of 180 degrees. This is a big deal for this senior..have always had a fear of yeast. Now I can't wait to bake my second loaf tomorrow. Thank you for the wonderful video!
Betty
I don't have a dutch oven can i use anything else all so can i dust with flour in the place of cornmeal husband doesn't like cornmeal
Lawrence
I tried your recipe for the first time tonight. The bread came out nearly perfect, the only problem being the salt level. I followed your recipe and thought that a tablespoon was way too much as I was adding it, but decided to go through with it anyway. That was a mistake. I think the correct amount would be around a teaspoon. A tablespoon made the bread almost inedible.
matt
when i tried this (twice now) the dough is super sticky and i can't get it to fold or stay. it looks just like yours after it sets overnight, but it sticks to everything (wood butcher block dusted with flour) so i have tossed it out. any tips? would the fact that the water in the beginning wasn't warm?
matt
D Bread
Waaay too SALTY!!! The salt amount needs to be adjusted down to about 3/4 teaspoon or 1 teaspoon. I ruined 3 cups of flour as well as my other ingredients. Thankfully I tested the dough before waiting overnight and remixed once I discovered the problem.
Eric Gunnar Rochow
sorry to hear that, i've found 1 tablespoon to be good for us. eric.
Cheri
What size Dutch oven are you using, Eric? My loaves, so far, aren't as tall on the sides as yours appear to be. My Dutch oven fits about 8qt of liquid in it. (is that huge?) LOL Otherwise the bread is GREAT!! (still working on video)
Eric Gunnar Rochow
Hi Cheri, I believe mine is a 6 quart , the larger dutch oven will yield a thinner loaf. Thx! Eric