
Build this homemade pallet pry bar with parts from the hardware store, no welding required. Grab a bunch of right angle brackets and some nuts and bolts, and make a pallet buster. Neat.
Pallet Pry Bar Parts List
Eight 4" right angle brackets
Two 3 ½" Grade 5 ⅜" bolts & nuts
Two ¾" ¼" bolts & nuts
Handful of lockwashers
Handful of ⅜" washers
Six ½" nuts to use as spacers
Three foot length of ¾" pipe
Right angle elbow ¾" pipe
Do a dry run in the hardware store and make sure this all works as best you can, it might save a trip to the store.
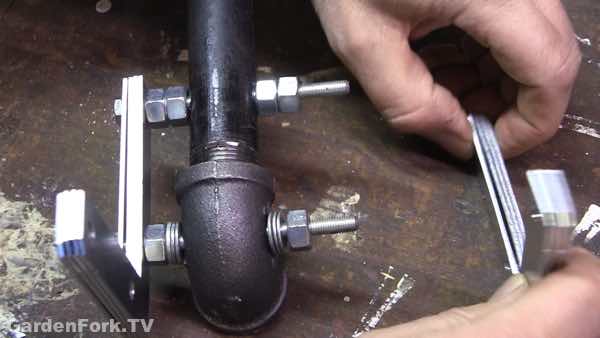
I don't have an exact measurement as to where to drill the holes, you can use this photo as a guide. You can drill this with a corded drill, or ideally, a drill press. Be sure to oil the bit as it cuts to keep it cool. The drill bit will wander when making the holes for the homemade pallet pry bar, so use a pointed metal punch or nail to set a point for the drill to sit in.
Drill out the existing holes in the brackets to accept the bolts.
I used nylon lock nuts on the two bolts that go through the pipe, if you can't find them, use lock washers to keep the nuts tight. The two smaller bolts that hold the brackets to themselves don't have to be Grade 5, regular ones will do.
The oversized nuts work great for spacing the brackets off the pallet buster. I made this wide to account for different pallets I have run into.
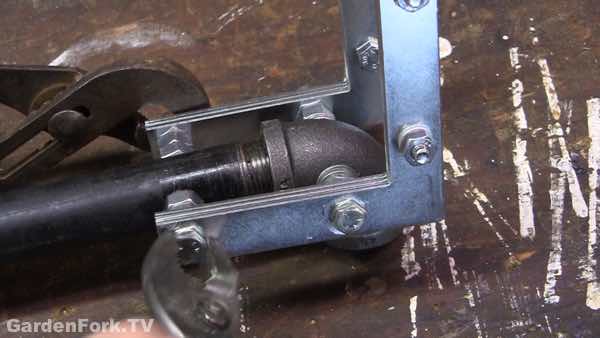
Be sure to tighten up the bolts! There is a lot of torque happening here, you don't want this to fall apart. After you have assembled the pallet pry bar, round off the sharp corners of the brackets. This will help minimize damage to the pallet wood, if you want to use it to build stuff.
I found the addition of the pipe elbow really helps this tool work well. It adds a little bit of leverage. I got the idea from the small wonder bar crowbar I have, it has a small loop of metal behind the business end of the bar.
Thanks to Darren and Rybitski of Instructables for the inspiration to build this.
What can we do to improve this pallet breaker? Let me know below.
Dave Polmon
Hi, Eric.
Fledgling beekeeper, western CT resident and hobby farmer. But more importantly, a lifelong (66) machinist. I ran a South Bend lathe after school when I was 8 years old. My family's version of "daycare".
Watching you ream the holes in the brackets made my skin crawl. Never, EVER, hold a piece you are drilling with your hands! I learned this rule the hard way while drilling a hole in a piece of sheetmetal from a leaf collector on a Bridgeport milling machine. The drill grabbed the sheetmetal, there was a loud bang, and my left hand felt like it had been hit with a hammer. For a long while I was afraid to look down, but when I did I was thrilled that it passed the count test, but when I flexed the hand not everything worked! I'd severed the tendons that control the little and ring fingers. Surgery reconnected things but I never regained full range of motion with the pinky.
If you can't fasten the piece to the table or in a vice, at least hold it with a pair of vice-grips, not your hand!
Richard Parker
instead of using sheet metal supports bolted together , use 6"x3/8" angle iron and weld spacers to the pipe then drill holes to connect together . it will be stronger !!
Karl Kelley
Check out the Izzy Swan Youtube channel. He's done a grat design
Karl
Stephanie
This may be a really dumb question, but what's wrong with a run of the mill pry bar from the hardware store? You know, the one piece kind that sorta looks like a tire iron?
Eric
@Stephanie, pry bars work fine. I use a 'wonder bar' to break down pallets. Part of this was wanting to see if I could make a tool, and the challenge of no welding. Plus with this tool, you can break down the pallet while standing, there is less bending involved. thx! eric.
Eric
@Karl, yes I've seen Izzy's videos, great guy. I like how a company helped him market the tool. well done, thx! eric.
Eric
excellent ideas Richard, thanks for those. I hope to improve my welding soon and make another one. thx! eric.
Eric
thx for the heads up Dave, appreciate the info. i will do that going forward. eric.
Carolyn G. Hardy
wow. I really appreciate your instruction. It probably takes a bit more time than welding, doesn't it? I'm looking for a different and more efficient way rather than welding.
Joe Radziszewski
I wonder how it would work too use all pipe. A long piece, a"t", two 90 angles and two short pieces. Screw them all together into a fork. I like the concept. Thanks.
Nell
Great Job. And entertaining as well.
Derrick
Great video, i had to watch this to help my father with a similar situation!
Paka Smurf
Eric,
I notice that you have increased some of the hardware sizes from the original video.
Would you please clarify the parts list needed, as well as the two pipe hole sizes.
Greg Everard
Hi Eric, I like the idea of using off-the-shelf components like that, I would have thought that reversing the elbow would cause less damage to the heavy wood you're prying the planks from as that is often also useful?
Cheers, Greg
Geren Manley
Made this.